If you’ve spent any time working on Google Cloud Platform, as an infrastructure engineer you’ll likely agree that managing infrastructure by hand can get complicated. One of GCP’s most popular services is Google Kubernetes Engine, a fully managed Kubernetes service that makes deploying and scaling applications easy without having to manage the underlying infrastructure.
While GCP provides great tools, it doesn't address some challenges in managing cloud resources. When you’re creating resources manually—either through the GCP console or CLI—changes to infrastructure can’t be tracked or versioned like code. This can make it difficult to keep track of the current state of your resources, especially when you're managing environments like dev, staging, and production. It also introduces human error and the time spent reproducing the same setup across multiple environments can become overwhelming.
That's where Terraform comes in. It's an Infrastructure-as-Code (IaC) tool that lets you automate provisioning and managing GCP resources like Kubernetes Engine, Cloud Function, Compute Engine, etc. By writing declarative configuration files, you can define your infrastructure, and Terraform takes care of deploying it.
In this guide, we’ll cover:
- What is Terraform, and how does it automate GCP infrastructure management?
- How do you configure your environment to use Terraform effectively with GCP?
- How do we define and provision GCP resources like Kubernetes Engine?
- Challenges in managing multi-environment cloud resources with Terraform.
- How can platform like Kapstan enhance your Terraform workflow by handling infrastructure problems such as scaling, providing visibility and monitoring?
By the end, you’ll know how to automate GCP infrastructure setup, ensure consistency across environments, and solve common challenges effectively.
Terraform helps track infrastructure changes through version-controlled .tf files, ensuring all modifications are recorded and can be reverted if needed. It also keeps a state file (.tfstate) to track the current infrastructure, allowing it to apply only necessary changes. Plus, Terraform ensures consistency across environments (dev, staging, production) by reusing the same configuration with different variables, avoiding manual errors, and saving time.
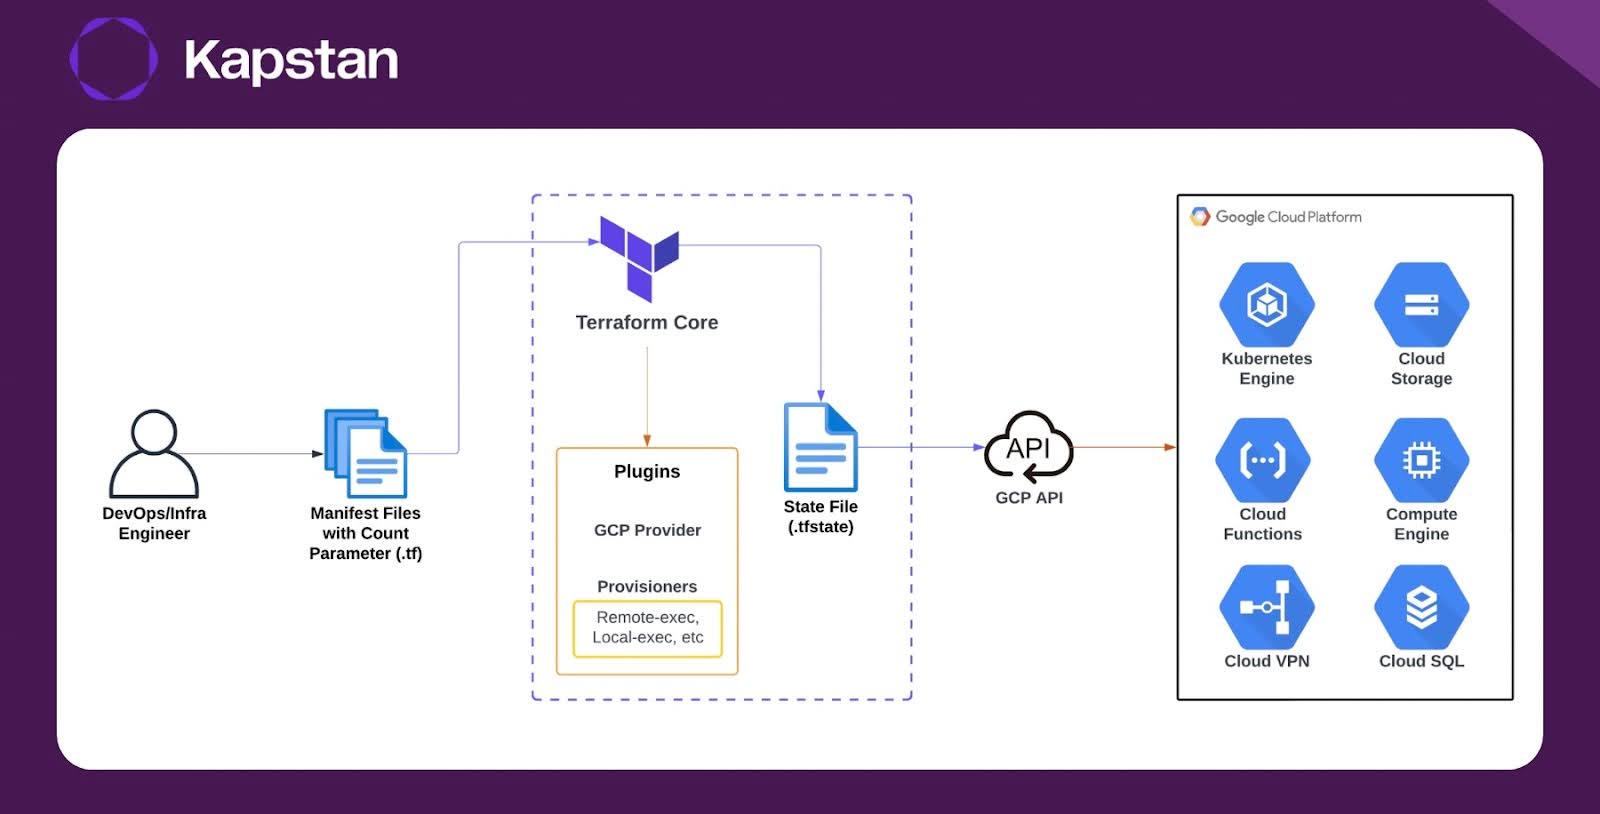
The diagram shows the Terraform workflow for GCP infrastructure:
- The DevOps/Infra Engineer creates configuration files (manifests) in Terraform to define GCP resources.
- Terraform CLI reads these files, configures the Google Cloud provider, and sets up the necessary provisioners.
- Terraform updates or creates the state file to track the current infrastructure state.
- It sends a request to the Google Cloud API to create or modify the infrastructure based on the configuration.
Setting up Terraform for GCP
Before jumping into Terraform, you need to make sure your GCP account is ready. First, ensure that you have the necessary permissions. Typically, you'd need a service account with roles such as Owner or Editor to create and manage resources.
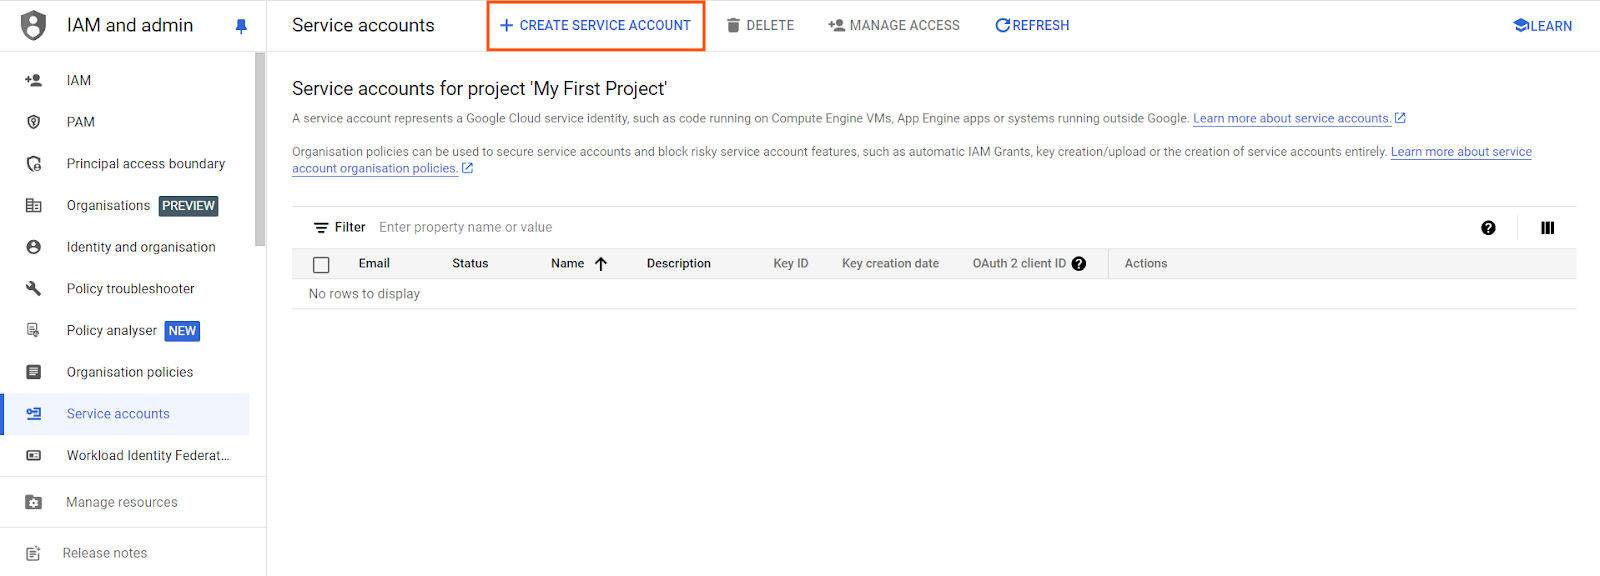
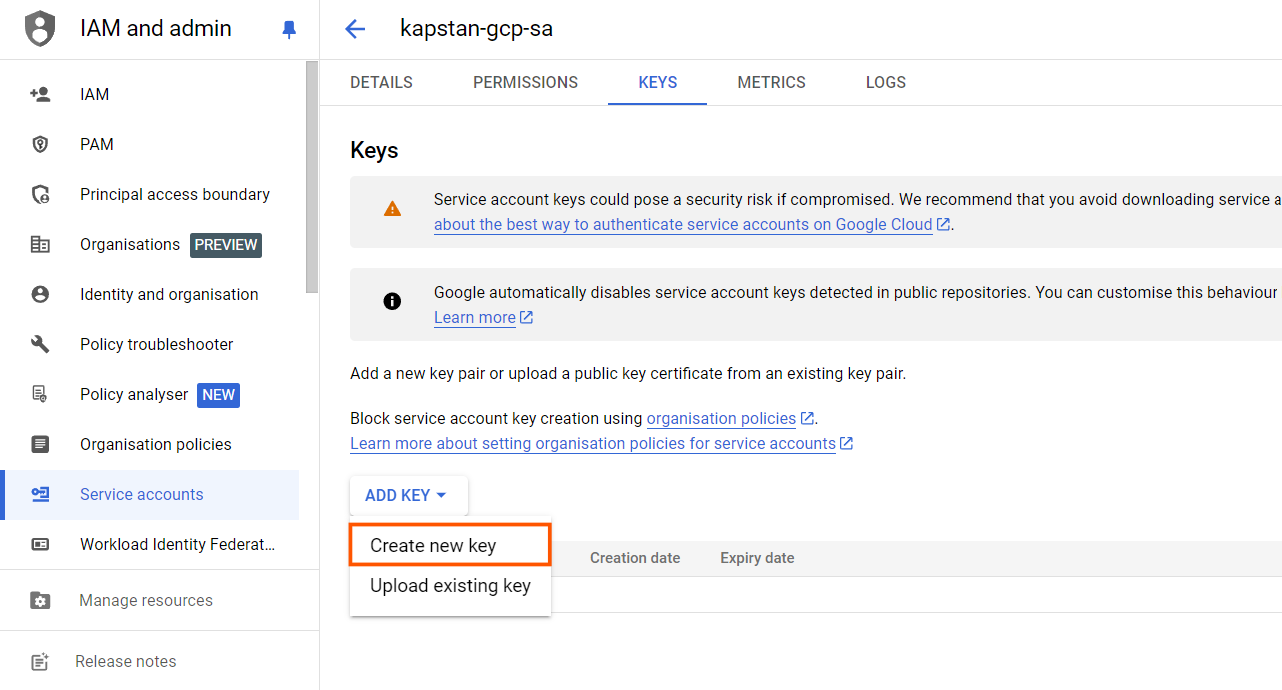
Also, don’t forget the service account key, which will be required in the Terraform GCP provider. It should be a JSON key that allows Terraform to access Google Cloud services securely without needing a user to log in. You can create and download a new key from the “KEYS” section of your service account.
Once that’s done, you can configure the GCP provider in Terraform. Create main.tf in your project directory and use the below example to set up a Google Kubernetes Engine using Terraform
provider "google" {
credentials = file("path-to-your-sevice-key.json")
project = "kapstan-project"
region = "us-central1"
}
resource "google_container_cluster" "kapstan_cluster" {
name = "kapstan-cluster"
location = "us-central1"
initial_node_count = 1
node_config {
disk_size_gb = 20
}
}
# Dynamically retrieve the GCP client configuration
data "google_client_config" "default" {}
# Get Kubernetes credentials for Terraform to communicate with the cluster
provider "kubernetes" {
host = google_container_cluster.kapstan_cluster.endpoint
cluster_ca_certificate = base64decode(google_container_cluster.kapstan_cluster.master_auth[0].cluster_ca_certificate)
# Retrieve the token dynamically using google_client_config # For a manual token, replace 'data.google_client_config.default.access_token' with your token
token = data.google_client_config.default.access_token
}
# To generate the token manually, run the following command:
# gcloud auth print-access-token
# Replace 'data.google_client_config.default.access_token' with your generated token
# Example:
# token = "YOUR_GENERATED_ACCESS_TOKEN"
resource "kubernetes_deployment" "nginx" {
metadata {
name = "nginx"
namespace = "default"
labels = {
app = "nginx"
}
}
spec {
replicas = 1
selector {
match_labels = {
app = "nginx"
}
}
template {
metadata {
labels = {
app = "nginx"
}
}
spec {
container {
name = "nginx-container"
image = "nginx:latest"
port {
container_port = 80
}
}
}
}
}
}
resource "kubernetes_service" "nginx_service" {
metadata {
name = "nginx-service"
}
spec {
selector = {
app = "nginx"
}
port {
port = 80
target_port = 80
}
type = "LoadBalancer"
}
}
This Terraform config sets up your Google provider with the credentials file and project details, then provisions a GKE service, a Nginx deployment, and a load balancer service. With this setup, you can deploy clusters consistently across environments, avoiding the hassle of manual configuration.
Now, initialize your working directory and download the GCP plugin with terraform init. After that, run terraform apply to create the GKE cluster and all the other related resources.


Check out your GCP account to verify the creation of the cluster.

Connect to the cluster and get the external IP of the nginx load balancer services to verify that the container is working correctly.

Now paste the external IP on the browser to see the Nginx welcome page.

However, even though Terraform simplifies resource management, it's not without its own set of challenges. Especially when managing infrastructure across multiple environments, things can get tricky. Let's dive into some of the key challenges you might face when creating GCP resources with Terraform.
Challenges in Creating GCP Resources with Terraform
Now, using Terraform is a great improvement, but there are still significant challenges when managing infrastructure with it.
1. When you're working with different environments—like development, staging, and production—each one requires its own Terraform state file. Keeping track of these state files can quickly become overwhelming, as they need to be managed separately for each environment. If the state file for any environment is misplaced or corrupted, you risk infrastructure drift, where the actual state of your resources no longer matches the desired configuration.
2. Another challenge is ensuring consistency across environments. While Terraform allows you to reuse configuration files, subtle differences in variables between environments (like regions, project IDs, or permissions) can introduce errors. Manually tracking these differences is time-consuming and prone to mistakes, which can lead to inconsistencies in your infrastructure across environments.
3. Additionally, there’s no native unified dashboard in Terraform for viewing the state of all environments at once. Engineers often find themselves switching between tools to monitor resource health, track changes, and ensure everything is running smoothly. This juggling act increases the complexity of managing multiple environments, making troubleshooting and maintaining infrastructure more difficult.
4. As you scale, managing multiple environments means you might end up creating multiple folders, one for each environment, each with its own configurations and state files. Now, imagine what happens as the number of environments or teams grows. There’s a serious lack of visibility—unless you dive into each folder and manually run terraform plan or apply, there’s no clear way to track how many deployments have been made, how many failed, or even who made the changes. This lack of centralized insight makes it harder to maintain a clean, stable infrastructure over time.
terraform-project/
  ├── production/
  │   ├── main.tf
  │   ├── variables.tf
  │   ├── outputs.tf
  │   └── terraform.tfstate
  │
  ├── staging/
  │   ├── main.tf
  │   ├── variables.tf
  │   ├── outputs.tf
  │   └── terraform.tfstate
  │
  └── development/
      ├── main.tf
      ├── variables.tf
      ├── outputs.tf
      └── terraform.tfstate
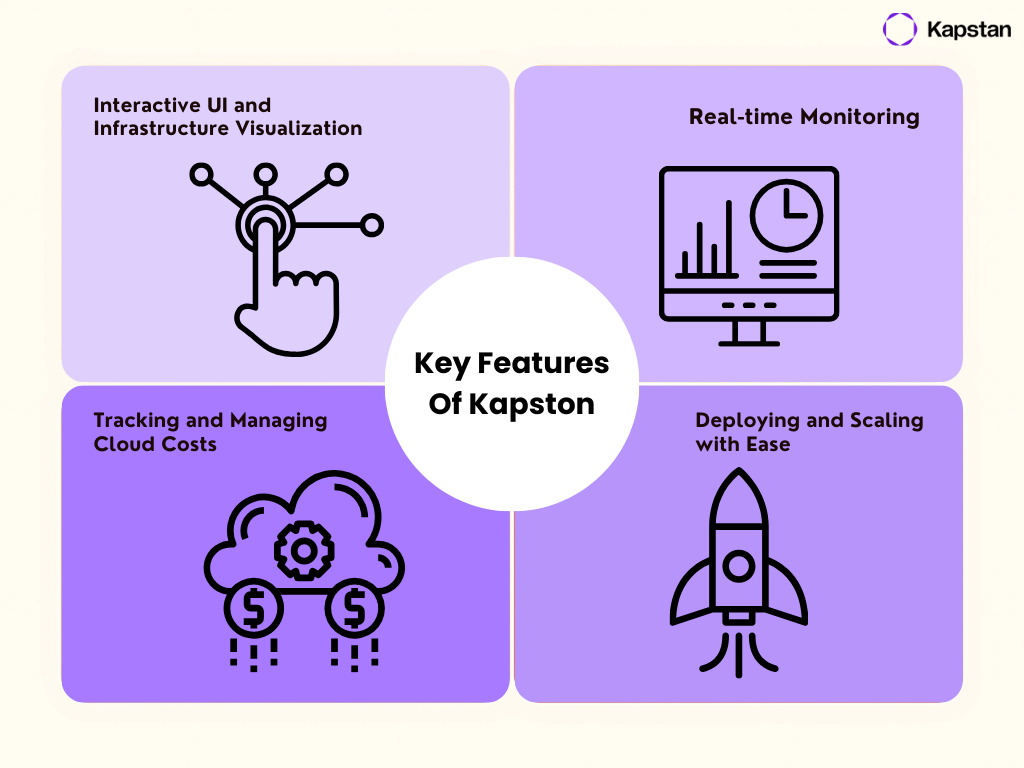
This is where Kapstan steps in, offering a centralized dashboard that simplifies managing multiple environments in Terraform. With complete visibility into your infrastructure, you can track deployments, monitor resource health, and visualize environments all in one place. Kapstan features an interactive UI, real-time monitoring, and effective cloud cost management, making it easy to detect who deployed or made changes to resources—information that would otherwise be difficult to find. It also allows you to track failed or faulty deployments, enhancing your ability to troubleshoot issues. Also, it simplifies the process of deploying and scaling, making it an efficient solution for large-scale infrastructure management.
Top 5 GCP Terraform Errors
Terraform is powerful, but errors are bound to happen, especially when working with cloud resources. Here are some common GCP-related errors you might encounter when using Terraform:
- API Not Enabled: Many GCP APIs, such as Compute Engine or IAM, need to be manually enabled in your project before Terraform can use them.
- Insufficient Permissions: If your service account doesn’t have the right permissions, Terraform can’t create or manage resources. You need to ensure your roles are properly assigned.
- Quota Exceeded: Hitting your quota limits is a common issue, whether it’s vCPUs, memory, or other resources.
- Invalid Resource Names: GCP enforces strict naming conventions. Terraform plans might fail if, for instance, you use uppercase letters or spaces.
- Region/Zone Mismatch: Deploying resources to an incorrect or unsupported region can halt your plans. Double-check your region settings when defining resources.
These errors highlight some of the complexities of managing infrastructure on GCP, especially when deploying across multiple environments. A single mistake in permissions, quotas, or regions can bring your entire deployment to a standstill.
This is where Kapstan comes in to provision the resources for you. Kapstan’s UI is interactive, allowing you to visualize your infrastructure as it scales, with real-time monitoring that makes troubleshooting more straightforward and proactive.
Introduction to Kapstan
Using Kapstan provides several benefits, especially when dealing with multi-environment deployments. Kapstan’s UI is interactive, allowing you to visualize your infrastructure as it scales. You get real-time monitoring that makes troubleshooting more straightforward and proactive.

Kapstan also lets you easily switch between different environments, such as production, development, and staging, making multi-environment development and management easier.

For example, without Kapstan, you might rely on several tools for deployment monitoring, and track cloud costs through a third-party service. Kapstan integrates all of these features into a single interface, reducing the time it takes to deploy and scale resources. Additionally, it provides health checks and cost management insights that are important for any organization managing large-scale environments.
While services like GitHub Actions automate your deployments, they don’t track or optimize cloud costs without plugins. With Kapstan, you get an all-in-one view of your cloud spend, alongside infrastructure monitoring, without the complexity of integrating separate tools.
Setting up Kapstan
Getting started with Kapstan is simple. After signing up, you can integrate your GCP account by providing the necessary permissions. Follow the connection guide for GCP on the UI itself to connect your account safely.
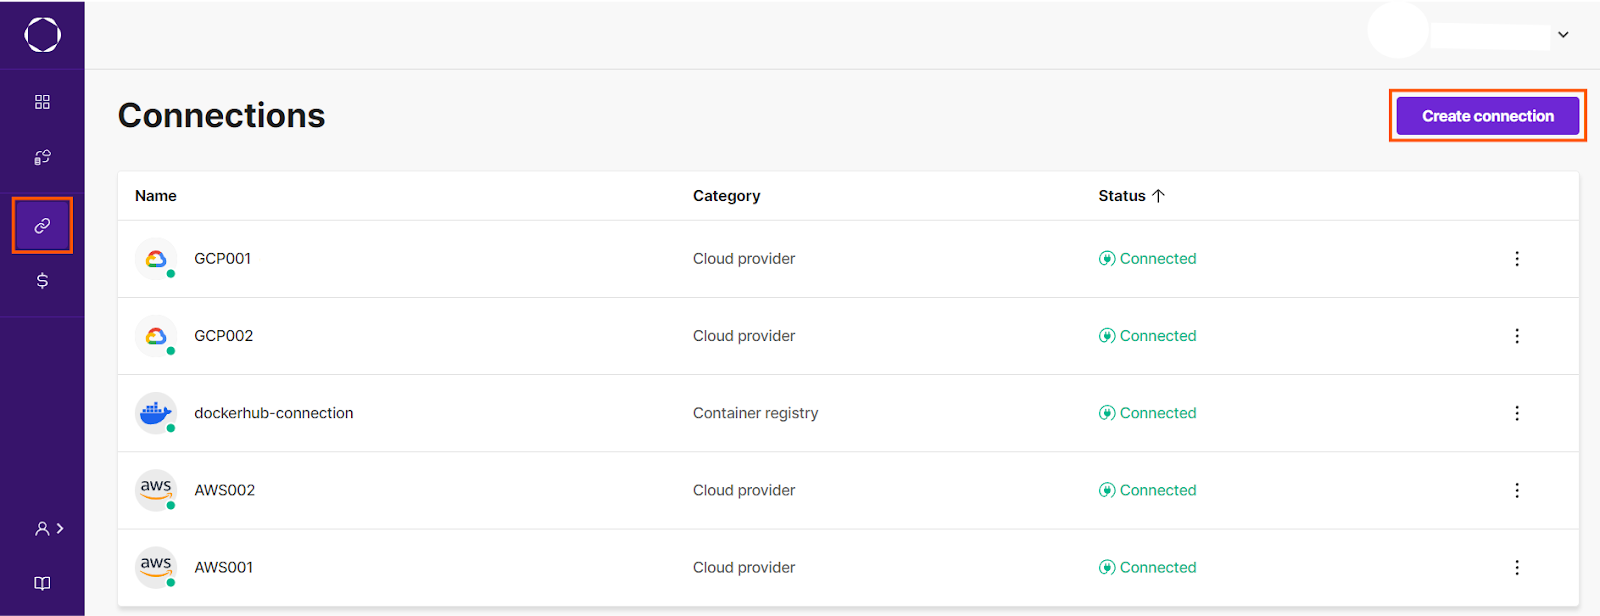
From there, you can create an environment and follow the walkthrough guide on the home page to create, manage, and scale GCP resources, including Google Kubernetes Engine, all through Kapstan’s interface.
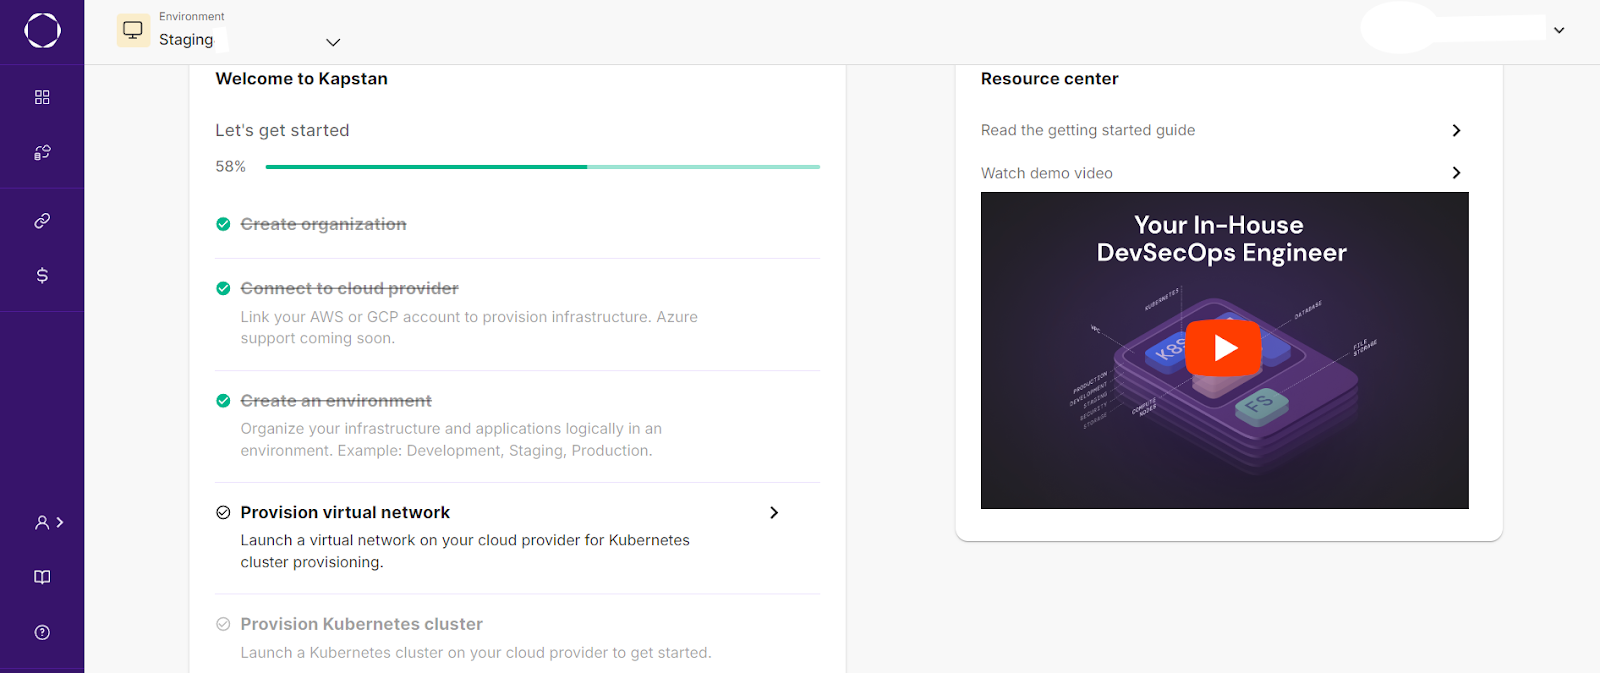
Now that you have successfully connected to your GCP account, let’s create a GKE cluster with Kapstan. But first, we need to provision a virtual network that would connect with the cluster.

After the virtual network has been provisioned, create the kubernetes as the next infrastructure and link the newly created virtual network with it.
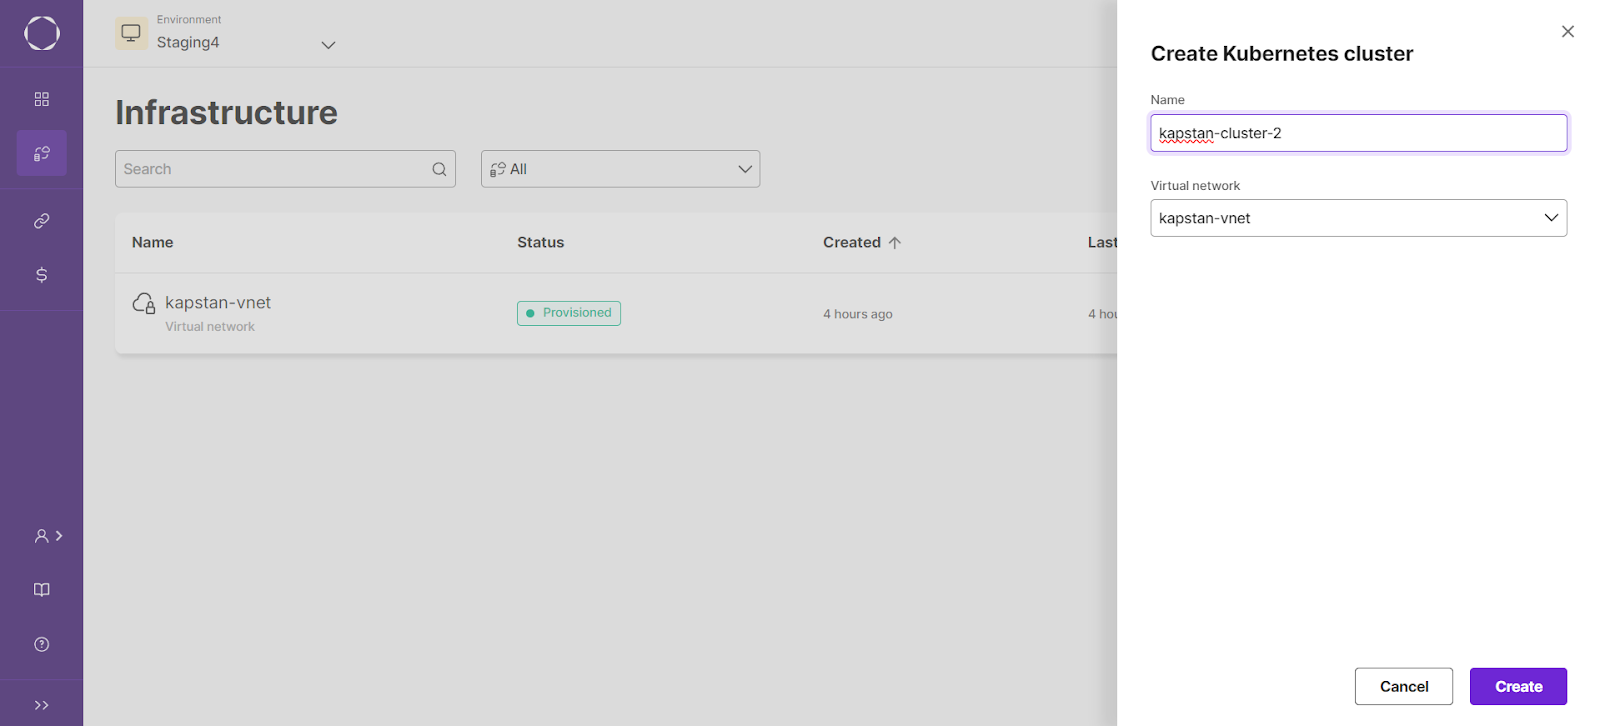
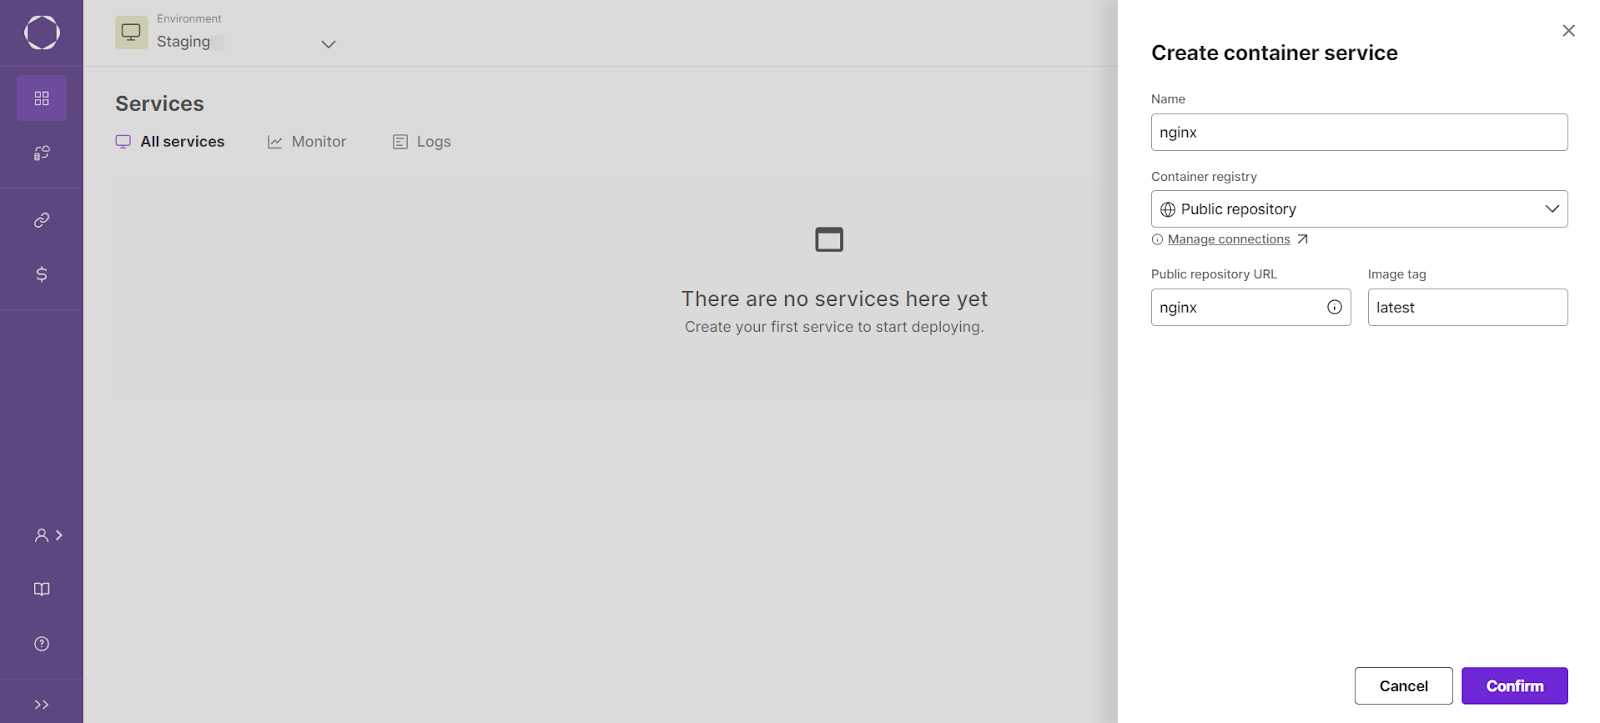
After successfully creating the cluster, let us create an Nginx deployment with Kapstan. In the services section, create a new container service and select the below configuration to deploy the Nginx container in the cluster:
Kapstan also allows you to set up auto-scaling for your resources, ensuring your infrastructure adapts to demand without manual intervention.
.png)
The platform’s monitoring tools also keep track of your resources, giving you insights into performance and potential issues before they escalate.
Key Points
To recap, using Terraform to manage GCP infrastructure has many benefits, from tracking infrastructure like code to deploying consistent environments. However, when managing multiple environments, Kapstan adds value by providing a unified dashboard for infrastructure visualization, monitoring, and cost management.
Here’s a quick comparison:
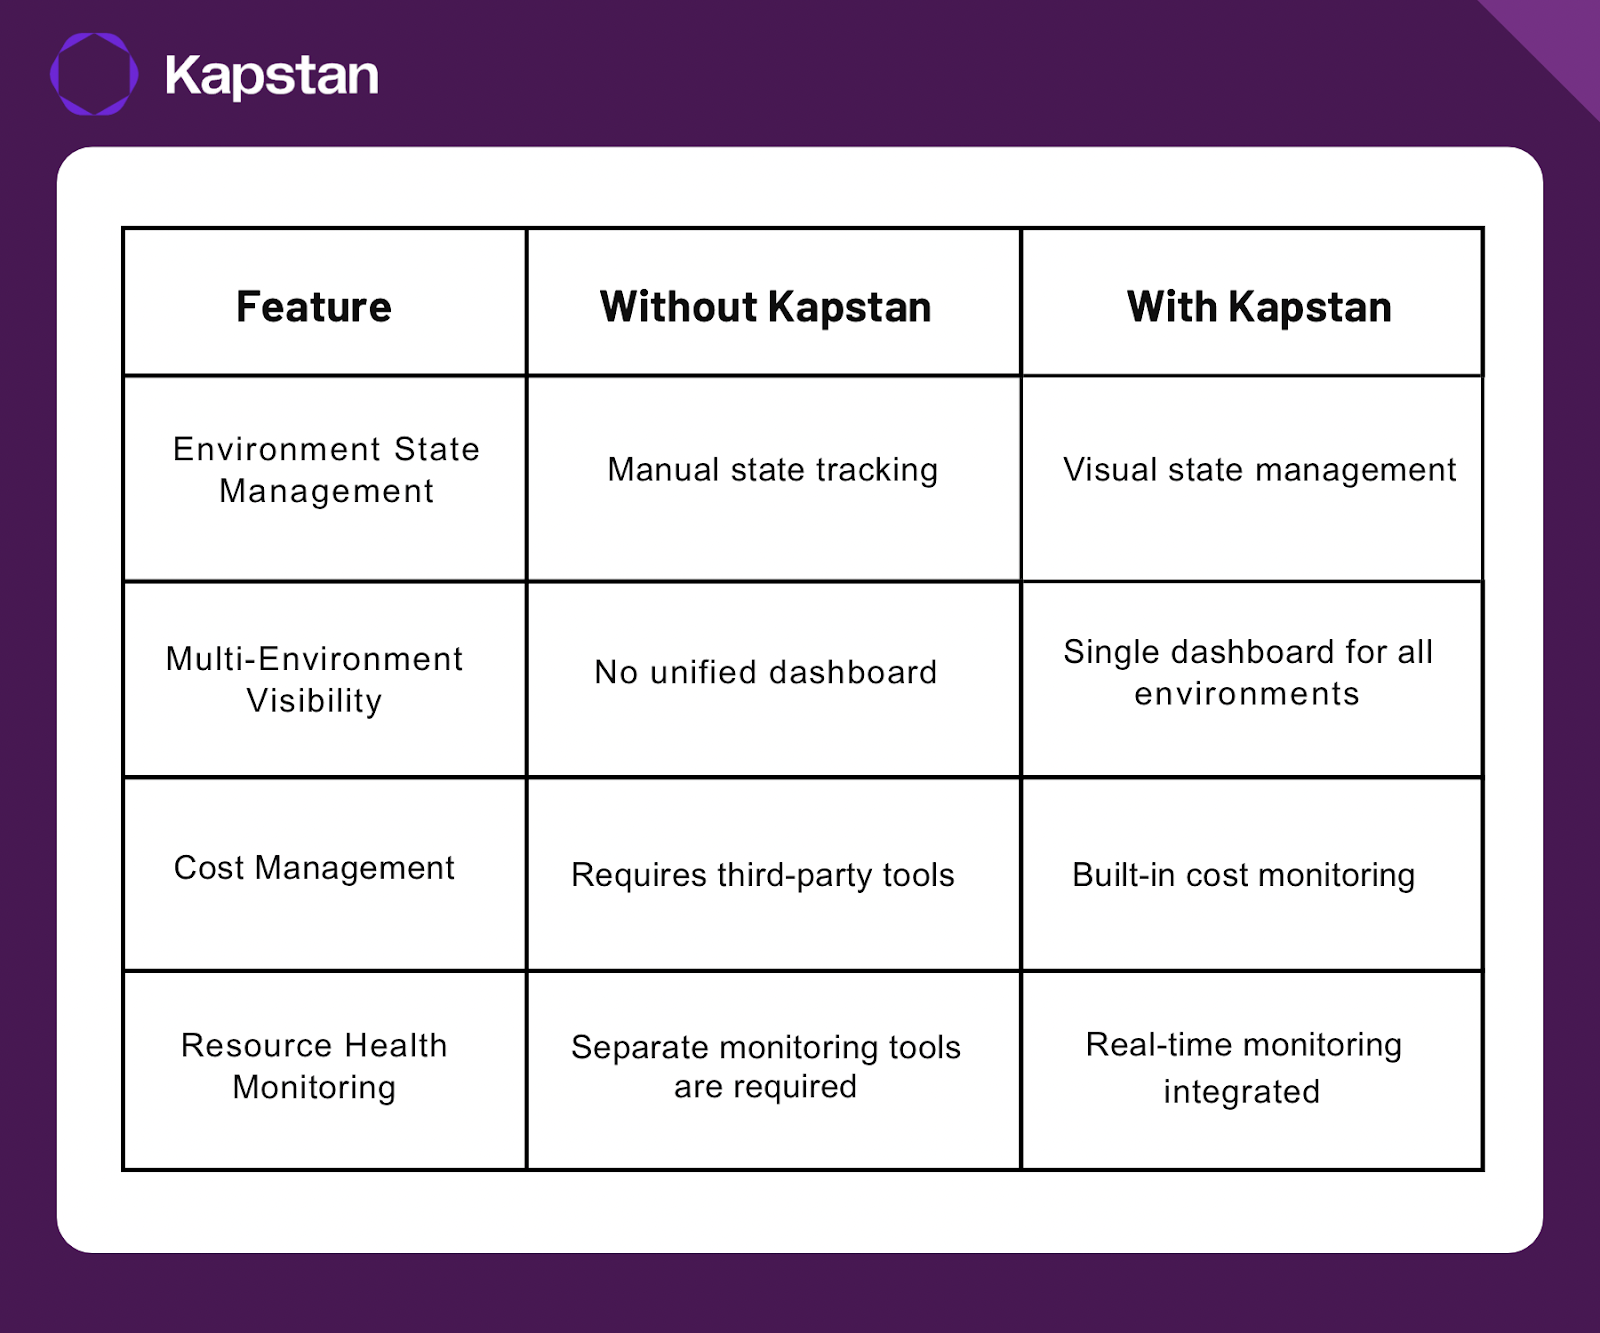
Using Kapstan, you can simplify your GCP infrastructure management and focus on building rather than firefighting infrastructure issues.
Commonly Asked Questions
Q. What is Terraform in GCP?
Terraform is an Infrastructure-as-Code (IaC) tool that allows you to automate the provisioning and management of Google Cloud Platform (GCP) resources. It uses declarative configuration files to define the desired infrastructure, and Terraform handles creating, updating, and managing those resources.
Q. What is Terraform used for?
Terraform is used to automate infrastructure management by defining resources in code. It helps provision, manage, and scale cloud resources (such as VMs, databases, and networking) consistently across multiple environments, ensuring that infrastructure changes are tracked, versioned, and reproducible.
Q. What is the Terraform equivalent in GCP?
In GCP, the equivalent service to Terraform is Google Cloud Deployment Manager, which also allows you to define and manage resources using templates. However, Terraform is more versatile as it supports multiple cloud providers, while Deployment Manager is specific to GCP.
Q. Can we create a GCP project using Terraform?
Yes, you can create a GCP project using Terraform. Terraform allows you to define and manage GCP projects by using the google_project resource in your configuration, enabling automated and consistent project creation across different environments.


