

A DevOps team managing cloud infrastructure across development, staging, and production environments often faces the same problems, such as differences in instance types, security groups, IAM policies, or networking rules that lead to failed deployments. Hours get wasted debugging why an application runs fine in staging but crashes in the production environment variables, often due to a missing environment variable, incorrect database endpoint, or mismatched API permissions. These issues arise from improper environment management.
Let's say a developer modifies a security group rule in staging to allow traffic on port 443 but forgets to apply the same change in production. Production rejects HTTPS requests because the security group is still blocking port 443, causing API failures and breaking external integrations. Or someone just changes an instance type in production to resolve a performance issue, but the next terraform apply reverts it to the previous type because the code still defines the previous instance size.
The solution is to manage each environment separately while ensuring infrastructure remains consistent. That means writing infrastructure as code (IaC), enforcing the same resource configurations across environments, and avoiding console or shell script changes that lead to drift. Terraform makes this possible by allowing teams to define infrastructure in reusable configuration files. These files can be applied consistently across development, staging, and production, ensuring that compute instances, security groups, networking rules, and other resources remain identical unless modified from the provider console or shell script. This prevents unexpected differences and reduces operational overhead.
Let's break down how to structure Terraform code properly for multiple environments and why it's important in maintaining reliable deployments.
Structuring Terraform Config for Multiple Environments
With Terraform, the right way to manage multiple environments is to avoid duplicating infrastructure code. Instead of copying the same configuration for each environment, break it into reusable modules. Define networking, security groups, IAM roles, and other common resources once, then pass environment-specific values when deploying. This keeps configurations maintainable—changes only need to be made in one place. This strategy not only eases maintaining the infrastructure but also minimizes errors by enforcing module reusability and making deployments efficient.
A structured Terraform Config ensures that shared infrastructure resources such as IAM policies, VPCs, and databases are defined once and referred to across all environments. By separating environment-specific configurations while maintaining a consistent codebase, teams can simplify deployments, reduce errors, and enforce best practices across the infrastructure lifecycle.
Let's take a look at how structured code can be written in multiple ways.
Using Directory-Based Separation
One of the simplest and most common ways to manage environments is by organizing them into separate directories. This keeps environments isolated and easy to manage. For example:
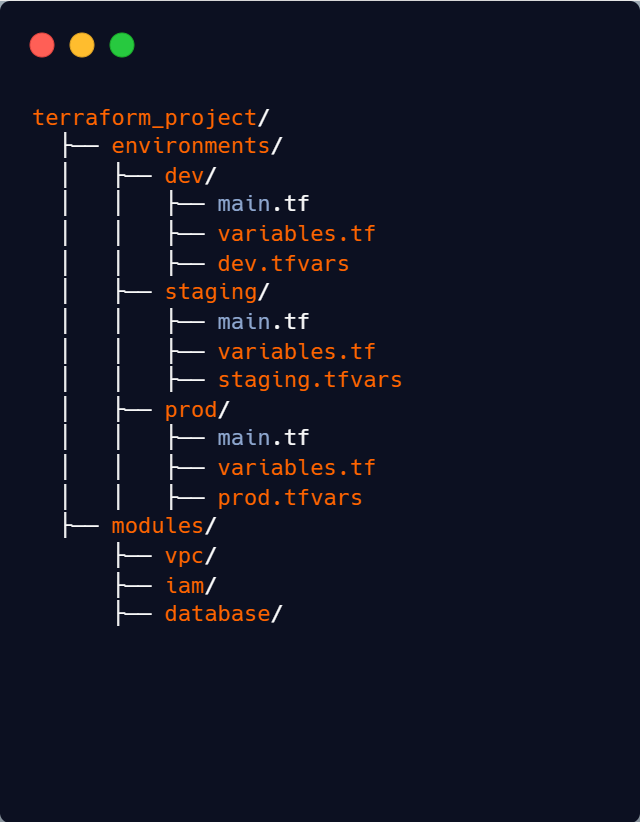
Each environment maintains its own dedicated Terraform configuration files, such as main.tf, variables.tf, .tfvars to encapsulate environment-specific configurations. The modules/ directory contains reusable components like VPCs, IAM policies, and databases.
This structure works well when environments have some differences, like instance sizes or allowed IP ranges, but still share most infrastructure components. For example, in development and testing, you might use smaller instance types like t3.micro to save costs while running basic functionality tests. But in production, you need a larger instance type like t3.large to handle higher traffic loads and ensure better performance. This approach allows teams to define and refer to the same module for both environments while making environment-specific adjustments where needed without duplicating entire configurations.
Creating Modules
Instead of copying and pasting the same Terraform resources across environments, use modules. Modules allow you to define infrastructure once and later refer them if required, reducing duplication of configurations and making updates easier.
Let’s say you need to manage VPC configurations across all environments. Instead of writing separate VPC configurations for dev, staging, and production, we create a network module:
// modules/vpc/main.tf
resource "aws_vpc" "primary_vpc"
{  cidr_block = var.cidr_block  tags = var.tags}
Now, in the dev environment, instead of writing a new VPC definition, just reference the module:module "vpc"
{ source = "../modules/vpc" cidr_block = "10.0.0.0/16" tags = { "Environment" = "dev" }}
With this setup:
- If you need to change the VPC configurations, you only update the module—not every environment separately.
- All environments stay consistent, reducing errors.
Using modules is a must-have for scaling infrastructure. It keeps code DRY (Don’t Repeat Yourself) and ensures that changes roll out smoothly across environments.
Isolating Environments with Terraform Workspaces
We don’t always need separate directories to manage multiple environments. Sometimes, environments are almost identical, with only small differences like instance sizes or feature flags. In such cases, maintaining separate directories adds up workloads. Terraform workspaces offer a cleaner way to handle this by letting you switch between environments within a single directory, keeping everything streamlined.
Terraform Workspaces
Terraform workspaces lets you manage multiple environments without creating duplicate directories. Instead of maintaining separate folders for dev, staging, and prod, you keep a single set of Terraform code and switch between environments using workspaces.
Each workspace has its own state file, meaning Terraform keeps track of resources separately for each environment, even though they share the same configuration.
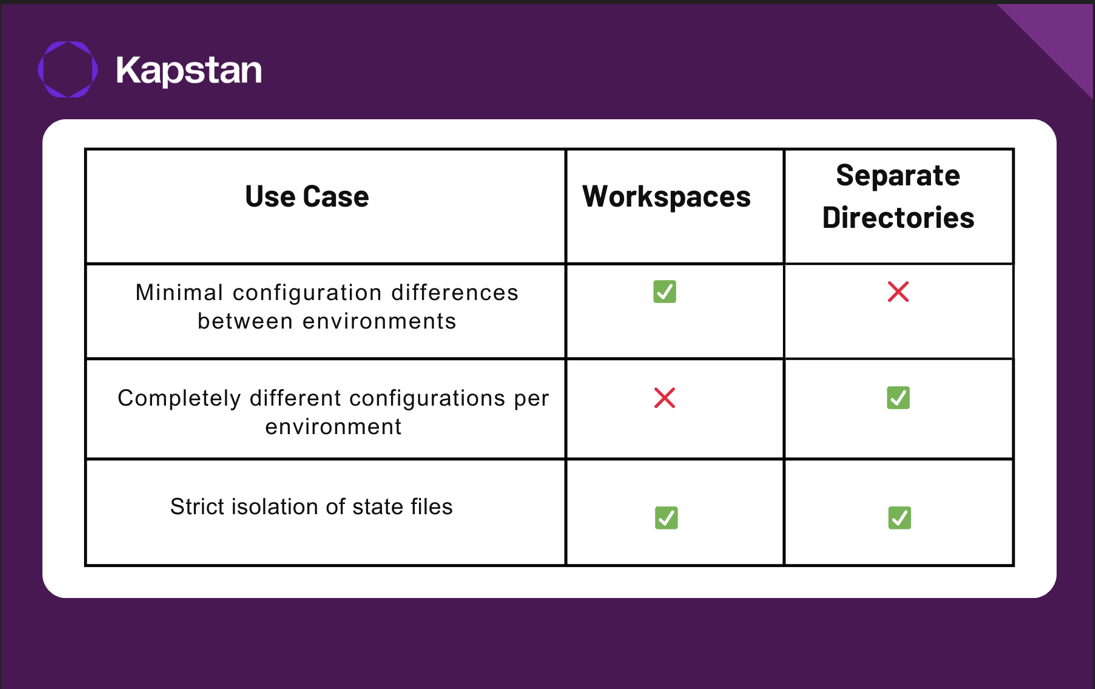
When to Use Workspaces vs. Separate Directories
Choosing between Terraform workspaces and separate directories depends on your infrastructure:-
- Use Terraform workspaces when all environments share the same infrastructure layout, meaning they use the same resources and modules. Workspaces work well when the differences between environments are minimal, such as varying instance types, database sizes, or a few configuration changes.
Workspaces keep everything in a single directory, making code management simpler. Since all environments share the same Terraform configuration, updates are easier to maintain. Teams can switch between environments quickly using terraform workspace select <name>, allowing for faster deployments.
- Use separate directories when environments have major differences, such as running in different cloud regions, requiring distinct networking setups, or enforcing unique security policies; separate directories are a better choice. If some environments need different module versions or resource types, directories provide better flexibility. Additionally, when strict isolation is required to prevent accidental changes from affecting other environments, using separate directories ensures better control and separation of resources.
Each environment having its own directory (e.g., prod/, dev/) ensures a clear separation between them, making it easier for teams to understand and manage configurations. This approach also ensures that each environment has its own state file, reducing the risk of accidental changes affecting other environments. Additionally, separate directories support different Terraform versions, providers, and configurations per environment, allowing greater customization.
Managing Workspaces
Terraform environment workspaces allow teams to manage multiple environments without duplicating code across directories. Instead of maintaining separate folders for dev, staging, and production, you can use workspaces to logically separate environments while using the same Terraform configuration. This approach is useful when environments have minimal differences and share the same infrastructure setup.
terraform {  required_providers {
aws = {
source  = "hashicorp/aws"
version = "~> 4.0"    }  }}
provider "aws" {
region = "us-east-1"}
resource "aws_instance" "prod_instance"
{  ami           = "ami-008f*****678e93a6”
instance_type = "t2.micro"
tags = {    Name = terraform.workspace   }}
Let's go step by step to set up and use Terraform workspaces properly.
First, we navigate to your project directory using cd ~/Desktop/terraform-aws
in which we have our main.tf, which is written as:-
terraform {
required_providers {
aws = {
source  = "hashicorp/aws"
version = "~> 4.0"
}
}
}
provider "aws" {
region = "us-east-1"}
resource "aws_instance" "prod_instance" {ami = "ami-008f*****678e93a6”
instance_type = "t2.micro"
tags = {Name = terraform.workspace}}
And now we run terraform init, which sets up the backend and downloads necessary providers. By default, Terraform starts in a workspace called default.
Once initialized, we can now create a new workspace using terraform workspace new staging, where staging represents the desired environment name. Terraform then maintains an isolated state for this workspace within the backend but does not create a separate state file. Instead, it organizes the state by appending the workspace name as a key. To confirm if the workspace is created, we run terraform workspace show
staging
To check available workspaces, use terraform workspace list, which displays all configured environments, and mark the current active environment with * like this
default
* staging
Now, if we want to switch workspaces, say back to default, and we use terraform workspace select default, allowing you to transition to the default workspace while maintaining your own separate configuration state information for all the environments. This is how it outputs after running it.
Switched to workspace "default".
When working with multiple workspaces, terraform operations like plan and apply work within the selected workspace. So, now we switch to staging using terraform workspace select staging, and run terraform plan and apply in it, which will create an instance tagged as staging. Similarly, we can create a workspace named prod, select it as an active workspace, and run terraform apply; then, prod workspace will create an instance tagged as prod.
Advantages of Terraform Workspaces
Workspaces help teams maintain a consistent Terraform state for multiple environments without managing multiple directories.
For teams managing infrastructure with minor differences across environments, Terraform workspaces offer several benefits:
State Isolation: Each workspace maintains a separate Terraform state, reducing the risk of environmental conflicts. For example, let’s say you have three workspaces named staging, prod, and default.
When you run terraform apply in the staging dev workspace, Terraform updates only the state file linked to staging. If you later switch to prod, the infrastructure changes made in staging will not appear there. This is important for preventing cross-environment interference and ensuring stability in production.
Additionally, this approach allows safe testing of infrastructure changes in lower environments, such as staging before rolling them out to production. Since the states are completely isolated, a misconfiguration or mistake in staging will not impact live applications in prod.
Code Reusability: A single configuration can manage multiple environments, eliminating redundant code. Terraform workspaces allow you to use the same set of Terraform configuration files across multiple environments without duplication. Instead of maintaining separate directories (staging/, prod/, dev/), you define the infrastructure once and deploy it across different workspaces. Instead of maintaining completely separate configurations and directories with redundant Terraform files, teams can manage everything from a single configuration, making updates and maintenance much easier.
Parameterizing Environment-Specific Configurations
We can make Terraform configurations more flexible and reusable by using parameterization. Effectively managing infrastructure across multiple environments, such as development, staging, and production, requires a well-defined strategy to maintain consistency, avoid redundancy, and streamline deployments. A well-organized Terraform setup ensures that configurations remain modular, reusable, and easy to manage across different stages of deployment. One of the best ways to achieve this is through parameterization, where environment-specific configurations are externalized into a separate configuration files rather than being embedded directly within the main configuration.
Using .tfvars Files
Terraform allows the use of .tfvars files to define environment-specific variables, making it easier to manage distinct settings for each environment without modifying the core infrastructure code. These files store key-value pairs for parameters like instance types, regions, and tagging strategies. Instead of manually adjusting these values in the Terraform configuration, you define them in dedicated .tfvars files, such as:
// dev.tfvarsinstance_type =
"t2.micro"region =
"us-west-1"tags = {
"Environment" = "Dev" }
Referencing Variables
Variables are defined in variables.tf and referenced in main.tf. To integrate these variable definitions into Terraform, you declare corresponding variables in a variables.tf file and reference them within your resource configurations.
variable "instance_type" {}

variable "region" {}

variable "tags" {}

resource "aws_instance" "web" {
  instance_type = var.instance_type
  tags          = var.tags
}
Once the .tfvars files are set up, we use
terraform apply -var-file="dev.tfvars"
This allows you to apply the appropriate configuration for a specific environment. Instead of modifying the main configuration manually, you can pass the desired .tfvars file using the -var-file flag. This approach ensures that environment-specific variables are correctly applied, reducing the risk of misconfigurations and enabling a more streamlined deployment workflow.
Setting Up and Managing Multiple Environments
Define Common Modules
Create a reusable VPC module with variables for CIDR blocks and subnets:
variable "vpc_cidr" {  description =

"CIDR block for the VPC"
type        = string}resource
"aws_vpc" "main" {
cidr_block           = var.vpc_cidr
enable_dns_support   = true
enable_dns_hostnames = true
tags = {    Name = "${var.environment}-vpc"
}
}
Write Environment-Specific Configurations
In dev/main.tf, call the module:
module "network" {
source      =
"../modules/network"  vpc_cidr    =
"10.0.0.0/16"  subnet_cidr =
"10.0.1.0/24"  environment = "dev"}
Configure and Test Remote Backends
Storing Terraform state remotely in a backend such as AWS S3, GCP Cloud Storage, or Azure Blob Storage ensures consistency across environments. In this example, we're using Amazon S3 as the remote backend for state storage:
terraform {
required_version = ">= 1.5.0"
backend "s3" {
bucket         = "config-bucket-575108920321"
key            = "dev/terraform.tfstate"
region         = "eu-north-1"
}
}
After this, run terraform init to initialize the terraform project: working directory.
Validate and Test Deployments
Apply configurations and verify the deployed resources:
terraform apply -var-file="dev.tfvars"
After applying, we get the following execution plan:-
Terraform used the selected providers to generate the following execution plan. Resource actions are indicated with the following symbols:
+ create
Terraform will perform the following actions:
## AWS Subnet Configuration
```hcl
resource "aws_subnet" "main" {
arn = (known after apply)
assign_ipv6_address_on_creation = false
availability_zone = "eu-north-1a"
availability_zone_id = (known after apply)
cidr_block = "10.0.0.1/24"
enable_dns64 = false
enable_resource_name_dns_a_record_on_launch = false
enable_resource_name_dns_aaaa_record_on_launch = false
id = (known after apply)
ipv6_cidr_block_association_id = (known after apply)
ipv6_native = false
map_public_ip_on_launch = false
owner_id = (known after apply)
private_dns_hostname_type_on_launch = (known after apply)
tags = {
"Name" = "main-subnet"
}
vpc_id = (known after apply)
}
```
---
## AWS VPC Configuration
```hcl
resource "aws_vpc" "main" {
arn = (known after apply)
cidr_block = "10.0.0.0/16"
default_network_acl_id = (known after apply)
default_route_table_id = (known after apply)
default_security_group_id = (known after apply)
dhcp_options_id = (known after apply)
enable_dns_hostnames = true
enable_dns_support = true
enable_network_address_usage_metrics = (known after apply)
id = (known after apply)
instance_tenancy = "default"
ipv6_association_id = (known after apply)
ipv6_cidr_block = (known after apply)
ipv6_cidr_block_network_border_group = (known after apply)
main_route_table_id = (known after apply)
owner_id = (known after apply)
tags = {
"Name" = "main-vpc"
}
}
```
Plan: 2 to add, 0 to change, 0 to destroy.
Do you want to perform these actions?
Terraform will perform the actions described above.
Enter a value: yes
After confirmation, Terraform applies the changes:
aws_vpc.main: Creating...
aws_vpc.main: Creation complete after 6s [id=vpc-007a3d95b420fccc7]
aws_subnet.main: Creating...
aws_subnet.main: Creation complete after 1s [id=subnet-0eb5f82adb4d000a0]
Apply complete! Resources: 2 added, 0 changed, 0 destroyed.
This ensures changes affect only the intended environment.
Best Practices for Multi-Environment Management
Use IAM Policies for Each Environment
Permissions should never be the same across environments. Staging and development should have separate roles with strictly limited access, and production should be locked down with zero direct access unless absolutely required. No one should be running Terraform applies or making manual changes in production without proper controls in place.
Require MFA for production access and restrict it to a secure VPN or corporate IP ranges. If someone needs temporary access, use just-in-time access controls rather than granting standing permissions.
Standardize Naming Conventions
If you don’t enforce strict naming rules, you’ll end up with a mix of prod-db, staging_database1, dev-database-temp, and sandbox-db-v2, and no one will know what’s what.
Good naming conventions should indicate the environment, such as development, staging, or production, clearly specify the resource type, whether it is a VPC, database, EC2 instance, or storage, and include a unique identifier like a project name or region to ensure clarity.
Set Up Guardrails to Prevent Accidental Mistakes
We sometimes make mistakes, but the infrastructure should be designed to block bad decisions before they cause problems. Use AWS Service Control Policies (SCPs), Terraform Sentinel, or Open Policy Agent (OPA) to enforce critical guardrails.
For example, Terraform applies in production should be blocked outside business hours to avoid late-night mistakes. Critical resources like RDS databases and S3 buckets should have deletion protection enabled, ensuring no one can remove them by accident. Encryption should be mandatory for all storage and networking components to maintain security and compliance.
Create Dedicated VPCs
Never put multiple environments in the same VPC. It leads to network conflicts, security risks, and operational headaches. A small mistake in a security group rule for a development environment could unintentionally expose production resources. The safest approach is to create a separate VPC for each environment with non-overlapping CIDR blocks. For example, production might use 10.0.0.0/16, staging 10.1.0.0/16, and development 10.2.0.0/16.
Traffic between environments should be tightly controlled. Development should never communicate with production, and staging should only connect when necessary, such as for controlled testing. Any required cross-environment traffic should go through VPC peering, Transit Gateway, or PrivateLink, ensuring no unintended access.
Managing Multiple Environments with Kapstan
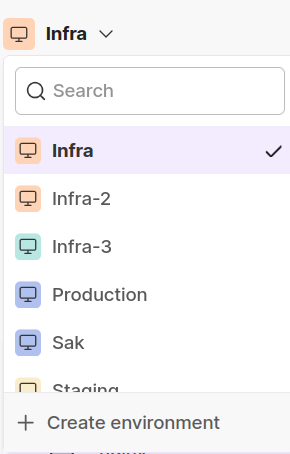
Kapstan simplifies the process of managing multiple environments, such as development, staging, and production, by providing a visual interface that eliminates the complexity of handling Terraform state files manually. Instead of juggling separate configurations, Kapstan allows you to create, manage, and switch between environments with just a few clicks.
In Kapstan, an environment represents a logical grouping of infrastructure and applications. Environments help manage resources for different products or projects in an organised way. For example, if you oversee two distinct products, you can create individual environments for each to ensure a clean separation of resources. Environments are also useful for segregating different operational stages like development, staging, and production.
With Kapstan, you can isolate environments logically without worrying about backend configurations or complex folder structures. Each environment operates independently, ensuring that changes made in development do not accidentally impact staging or production. Here’s a look at how Kapstan helps manage environments effortlessly:
- Logical Isolation: Each environment operates independently, ensuring changes in development don’t accidentally affect staging or production.
- Simplified Deployment: Instead of managing complex Terraform configurations, Kapstan enables deployment with minimal manual intervention.
- Visual Management: The intuitive interface allows teams to handle configurations like environment variables, scaling, networking, and storage without digging into code.
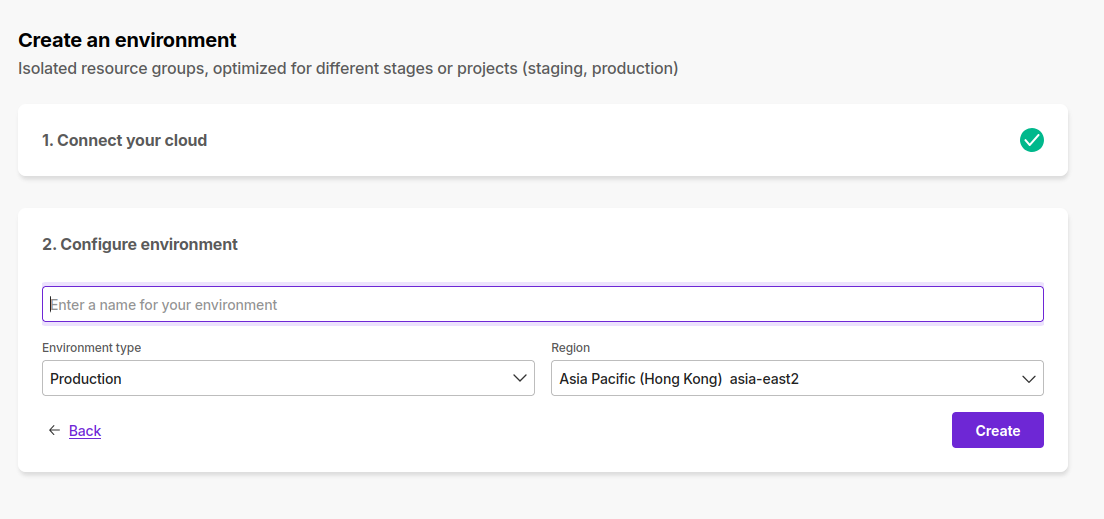
Creating new environments is pretty simple. Simply click on "+ Create environment," and Kapstan handles the underlying infrastructure configurations automatically.
This approach reduces the risk of misconfigurations and ensures consistent deployments across all environments.
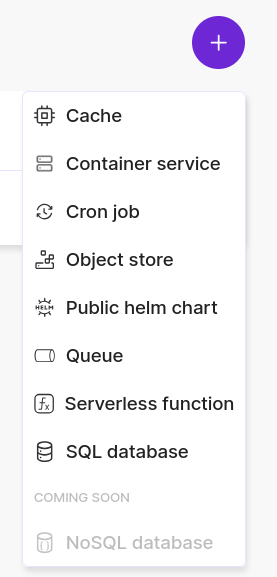
In addition to environment management, Kapstan also simplifies the deployment of resources like caches, container services, cron jobs, object stores, public Helm charts, queues, serverless functions, and SQL databases. The intuitive interface allows you to select and deploy these resources quickly without writing complex Terraform scripts:
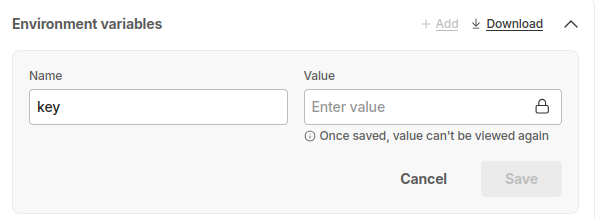
Kapstan also makes managing your environment variables much simpler. You can add, modify, and secure environment variables effortlessly, ensuring sensitive data like API keys and secrets are handled securely.
Kapstan eliminates the need for manual intervention in managing state files or writing repetitive configuration code. It enables DevOps teams to maintain environment consistency, reduce deployment errors, and simplify infrastructure management workflows efficiently.
To learn more about how Kapstan handles environments, you can refer to this documentation.
Conclusion
By now, you should have a clear understanding of how to manage multiple environments with Terraform using a structured approach. By organizing Terraform code effectively, leveraging workspaces, parameterizing configurations, and following best practices, DevOps teams can achieve reliable and scalable infrastructure management. Using tools like Kapstan further streamlines this process, reducing complexity and ensuring better control over deployments.
FAQs
- How do you manage multiple environments in Terraform?
To manage multiple environments in Terraform, you can utilize separate directories with distinct state files and variable configurations for each environment, ensuring clear isolation and tailored settings. Alternatively, employing Terraform workspaces allows for managing different environments within the same configuration by isolating separate state files, though this method may have limitations.
- What are the disadvantages of Terraform workspaces?
Disadvantages of Terraform workspaces include challenges in isolating backend configurations, which can lead to potential state conflicts between environments. Additionally, workspaces may not provide adequate separation for critical environments like production, making it difficult to manage different backend configurations or provider settings.
- How would you manage the same set of resources for different environments like dev staging production workspaces?
To manage the same set of resources across different environments, such as development, staging, and production, it's advisable to use separate directories or repositories for each environment, each with its own state file and variable configurations. This approach ensures clear separation and reduces the risk of unintended changes across environments.
- What is the difference between Terraform modules and workspaces?
Terraform modules and workspaces serve different purposes: modules are reusable configurations that promote code organization and reusability, while workspaces allow for managing multiple instances of states within a single configuration. Modules help in structuring code for different components, whereas workspaces manage different instances of state.


